Chart Interpretation Forum: Learn and Share Insights: Page 11 Topics
I am keen to hear any thoughts, advice and interpretation around my chart. also what does all the planets in the 12th house mean and how bad is the mars square pluto in my chart really
In synastry... our mercury conj saturn..
What does it all mean?
Cancer asc and sun gemini moon, mars, and mercury scorpio jupiter and pluto leo venus pieces saturn capricorn neptune and uranus pluto also has an influence in every planet.
This is my birthchart, thank you
Hello everybody! so, i'm still studying astrology and i have a few questions about my natal chart: -will i have children and get marry?
Making this thread for the readings i offered to the judges as a show a thanks fir helping me out as judges for the astro gaming thread i made.
So i've been reading up on chiron's and i'm slowly learning about them & their "healing" abilities.... however, now that i am evaluating different aspects...
Hello all, i've just recently started researching natal charts and was wondering if someone could point me in the right direction. i have no clue how to create one, or where to even begin.
Hey guys, been studying a lot of astrology lately and i'm looking to see if anyone wants to swap readings. i can read natal charts, progressions, solar returns, looking at the general character traits or your future/past transits.
Hi all, please be kind to interpret my natal chart, i am new to this and just started learning lol link - i need to know about career and relationships specifically. i am going through a tough phase of career issues right now
So i give you my chart. what does all of this circle and lines and shit mean?
If so, please let me know and i will pm it to you. thank you :)
I appear as a serious and reserved guy, so i'm wondering, what kind of woman would feal great and happy next to me
According to walter pullen's chart at astro.com top 5 dominant planets 1. venus 17.9% 2.
Interested in travel, romance, and just general interpretations! thanks.
Does anyone else have this sq in their chart? how do you fair?
Can somebody help me to analyze this? everyone is welcome here s link
Would be awesome if i could get a third person analysis out of my chart -- thank you in advance!!
Gemini male - capricorn female currently friends - pretty sure we're into each other - might ask her out - just interested in details
The little dashes on the aspect symbols on astro.com so if the square has a dash is it that not as strong or something?? example what's circled in blue
Gem male. 29.
This house represents your outer personality that you express out to the world. your self-interest, wellbeing and even your physical appearance is described by this house.
How do you predict a chart if sun, aries is in 12th house and moon libra is opposing it? we know that aries is the first sign, but how it will be if its position is in 12th house?
Hey everyone, i'm new here and i'd like to know if rising signs really determine how others see you or if other planets do that. my rising sign is apparently libra but i don't feel like i have those personality traits or even look like one!
What is the difference between sidereal and tropical? :/
Sun cancer 8â°22' ascendant aquarius 18â°08' moon scorpio 20â°12' ii aries 7â°27' mercury cancer 28â°10' iii taurus 12â°22' venus taurus 23â°44' iv gemini 6â°54' mars virgo 3â°57' v gemini 27â°35'
So my mercury is in sagittarius and some kind of calculator told me that it is in the direct station of mercury or in direct motion. what does this mean?
Ask a question, post your chart, lets roll. what in mh chart makes me selfish, introverted and with zero desire to date and try out love?
My first great niece was born last night - she was a month early to the day - anyway, everyone is healthy and happy but now i have this little gemini and i think she has a grand cross in her chart? anyway, would love any feedback on this most perfect ang
Could anyone tell me more about these placements, they really confuse me. are there any more people with these placements?
Anyone know if having jupiter in the 7th house influences cheating? jupiter is in virgo in this case and the ruler of the 7th is the sun/leo.
Asked this question: will he respond back to my message? hi all!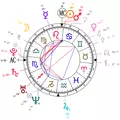
Been thinking about this for awhile. i would really like a professional chart reading.


I just noticed my cancer mc cappy ic and what it means. i need to learn more.
Hey guys! i am trying to understand a t-square i have in my chart.
Could someone please explain from their own experience what it felt like when the female moon conjunct the male partner's ic? who is affected more?
Just beginning to learn the ins and outs of all of this because i could never get clarification on my sign being born right the the start of scorpio season and end of libra; different sites have always given me varying answers, even though i've always
Hi how do i insert my chart for interpretation? or using my date of birth 5th december 1974 time of birth 23.53 - philippa jane gordon copleston - what should i do?
Sun pisces 5â°34' ascendant aries 4â°17' moon capricorn 3â°22' ii taurus 13â°45' mercury aquarius 9â°08' iii gemini 10â°24' venus capricorn 22â°41' iv cancer 2â°22' mars leo 18â°09' r v cancer
Don't understands
This helps, too: rising leo 25â° sun aries 8â° moon libra 4â° mercury aries 27â° venus taurus 13â° mars gemini 27â° jupiter leo 3â° saturn aquarius 5â° uranus capricorn 13â° neptune capricorn 16â° pluto scorpio 20â°